Up and Running
Reactive Development
In this Section we’re going to begin a new project and build a kind of boilerplate. An optimal setup for developer happiness and productivity that we can use in future projects.
First, we’ll setup webpack and the webpack-dev-server.
We’ll then unlock functionality to hot-reload css changes as we make them.
We’ll look at how syntax errors can be surfaced in the browser.
We’ll create our own webpack-dev-server with express and middleware.
Finally, we’ll look at how we can hot-reloading even the server-side code for a completely terminal free experience.
Let’s get into it.
In the terminal:
mkdir webpack-course
cd webpack-course
mkdir src dist config
Now, we should also setup a sensible default for git code versioning and initialize with NPM.
git init .
npm init -y
That creates a package.json file.
Gitignoring the Node Modules Folder
echo "node_modules" > .gitignore
Installing Webpack
Now let’s use npm to install the webpack package.
npm install -g webpack webpack-cli
Webpack command (sometimes) not found
In your terminal, when you run:
webpack -v
You should get back a version number. Like 3.11.0 or 4.0.1. If you instead get.
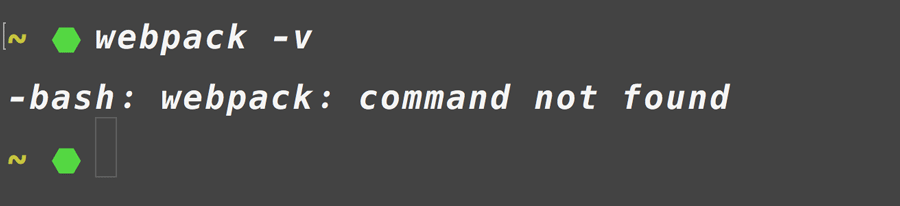
This is a problem with webpack not being in your PATH in Bash, the program that is run in Terminal.
If you're using Windows, there is a program called PowerShell that does the same thing. Gives you Bash commands in Windows. We'll be using Bash a lot in this course.
The simplest fix for this is to install webpack and the webpack-dev-server in a moment using the -g flag.
The better fix is to use node via the Node Version Manager.
Zero Config
Technically Webpack 4 can be used in a configuration free way. But in my tests you really can't get very far without a loader or 2, so this seems aimed at easier onboarding for simple apps with like 1 index.html.
webpack --mode=development --content-base=dist
Webpack Config
Now we need to create a config file to setup our development build process.
touch config/webpack.dev.js
Let’s open our code editor in this directory and begin editing our
webpack.dev.js file. We’ll start by defining a module.export in the CommonJS
style. Export an object. This object takes 3 parameters to start. Entry, Mode and
Output.
const path = require("path")

module.exports = {
  entry: {
    main: "./src/main.js"
  },
  mode: "development",
  output: {
    filename: "[name]-bundle.js",
    path: path.resolve(__dirname, "../dist")
  }
}
mode is a new (required) config option in Webpack 4. It allows webpack to create sensible defaults for development and production environments and also perhaps allows developer to use 1 config for both environments. Though, I wouldn't recommend that approach. mode is not an option in Webpack 3. So you would leave that off.
The entry object defines where webpack starts. This is the file that will
contain references to all the other files we need to include in our build. The
convention is to place it in src and call it main.js.
So let’s make a src/main.js file.
touch src/main.js
All paths within the entry object are relative to where Webpack is run, in our case, we’ll be running from the root of our project.
Output takes 2 properties. filename, which can be just a hardcoded name or a
placeholder. If you have several entry points it’ll output several files.
path is an absolute path in your file system. So instead of hardcoding that,
we can using Node’s path package, which comes standard with Node to resolve
the absolute path for us and resolve it to dist, which will be our output
directory.
Now let’s run Webpack in our terminal pointing to our config with this argument.
webpack --config=config/webpack.dev.js
We have output! Cool. Webpack outputs a main-bundle.js which looks like this.
'
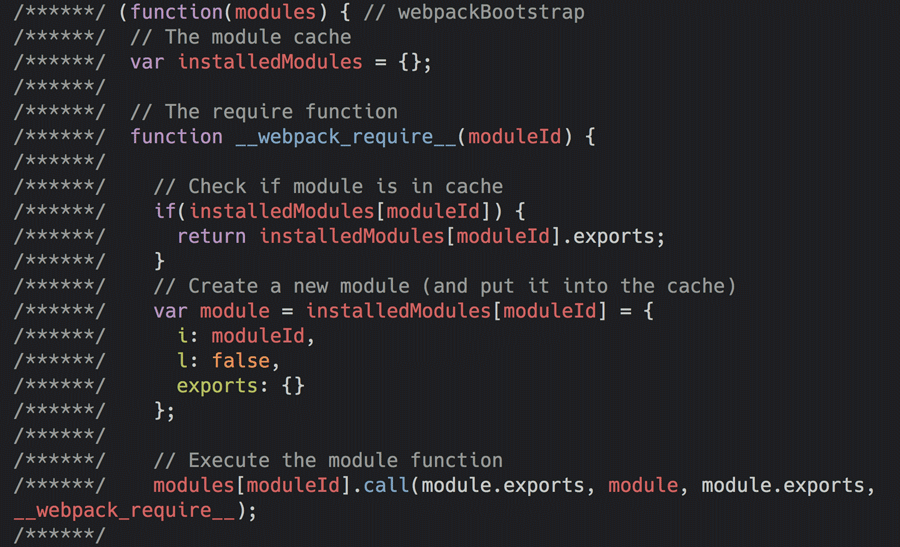
We’ll do a deep dive on this in a later article.
It’s time to get this running in a browser. We’ll need an index.html in
dist, with the bare-minimum body and script pointing at our main-bundle.js
file.
In the terminal:
touch dist/index.html
Now in index.html:
<body>
  <h1>Hello World</h1>
  <script src="/main-bundle.js"></script>
</body>
Webpack Dev Server
Webpack dev server is it’s own package, so we’ll install that with npm.
npm install webpack-dev-server
Now our Webpack config object needs 2 more properties to make hot-reload work.
const path = require("path")

module.exports = {
  entry: {
    main: "./src/main.js"
  },
  output: {
    filename: "[name]-bundle.js",
    path: path.resolve(__dirname, "../dist"),
    publicPath: "/"
  },
  devServer: {
    contentBase: "dist"
  }
}
devServer requires the param contentBase, which will tell the devServer where
to find the webroot of our site, in other words, where the index.html lives.
The other new property is is in the output object. It gets an optional
publicPath parameter. This is useful when you’ve got a javascript file in a
subdirectory, otherwise the dev server will use the root of your contentBase.
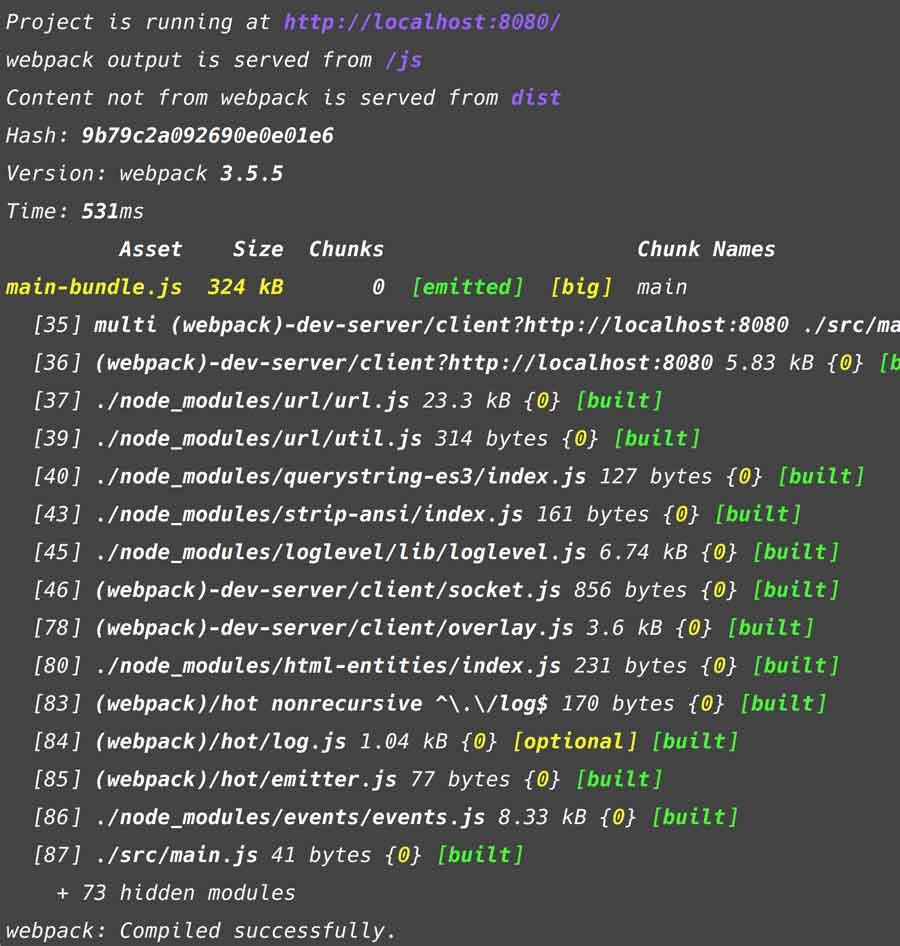
webpack-dev-server --config=config/webpack.dev.js
And you can see that in the output here.
Command double-click on the URL to open it in your browser. And it works. Let’s
see if we have reloading in the browser. Let’s add an alert to main.js and
save it.
alert("Wow!")
And our browser refreshes and immediately grabs our attention. You can see there’s a couple of extra files here in the Network tab besides main and index.
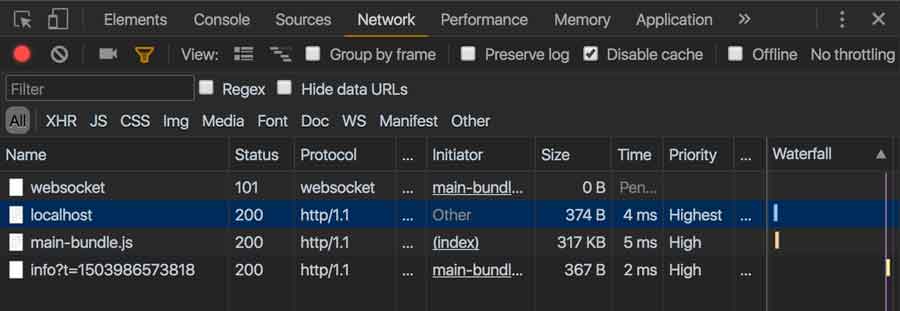
That’s the devServer establishing a websocket connection for hot-reloading. It
automatically adds all of this code to main.js, plus a lot of wrapping
functions that bloat the file. This makes files look unnaturally big in
development, though they’ll be left out of any production bundles.
In Sum
In this first article we got a new project going with webpack installed. The
webpack-dev-server command brings us hot reloading on our javascript file
right out of the box.
The final code should look like this
git checkout setup-final
Next Up
Pretty cool, but webpack also handles css, images and other kinds of files.