CSS Extensions, Imports and Auto-Prefixing
In the last article we looked at the various Preprocessors for HTML. Now we'll look at the CSS side with popular solutions like SASS/SCSS, Less and Stylus. Finally, we'll add an Auto-Prefixer using PostCSS, to remove a cross-browser headache.
We're starting where we left off in the HTML Templating article. If you need to catch up:
git clone https://github.com/lawwantsin/webpack-course.git
cd webpack-course git
checkout css-prep
npm install
CSS Preprocessors/Extensions
Over the past decade, we've seen valiant attempts to move CSS further towards a Turing complete programming language and simplify design for developers.
Let's approach all 3 of these SASS, LESS and Stylus at same time, since they're done the same way. We start, as usual, in the terminal:
npm install node-sass sass-loader
touch main.sass
In your main.js, change css to sass.
require('./main.sass')
Add another loader to webpack.dev.js rules:
{ test: /\.sass$/, use: [ { loader: "style-loader" }, { loader: "css-loader" },
{ loader: "sass-loader" } ] }
We need only add another loader to the end of what we do for .css files. We
could replace sass-loader with less-loader or stylus-loader to the same
effect. The naming convention for loaders in surprisingly predictable. So the
following packages would also need to be installed.
npm install less less-loader npm install stylus stylus-loader
Imports and Variables
Partial files work as expected with an @import, as do variables, loops and the
rest of the fun, all compiled by the loader, which in turn invokes node-sass
or the node equivalent in less and stylus.
Let's use an import for illustration: In main.sass take the rules under
profile and copy them into a new file
touch src/profile.sass
Then include that in your main.sass with:
@import ./profile
Whoa, way too easy. The import is combined into the original main and not
through a separate request, like you'd expect and even variables can cross from
main to profile if you place them above the @import.
$width: 300px
@import ./profile
In profile.sass:
img border-radius: 100%
width: $width
box-shadow: 0 0 20px black
Auto-Prefixing with PostCSS
A great goal of an optimal developer experience is to abstract browser compatibility away into a part of the CSS build process.
In webpack.dev.js change the sass rule:
{ test: /\.sass$/, use: [ { loader: "style-loader" }, { loader: "css-loader" },
{ loader: "postcss-loader" }, { loader: "sass-loader" } ] },
Create a new file and add the necessary libraries.
touch postcss.config.js
npm install postcss postcss-loader
So the postcss.config.js file should exports a pretty simple object.
module.exports = { plugins: [require('autoprefixer')] }
When we reload the dev server and the browser perhaps, we see that flexbox prefixes have been added.
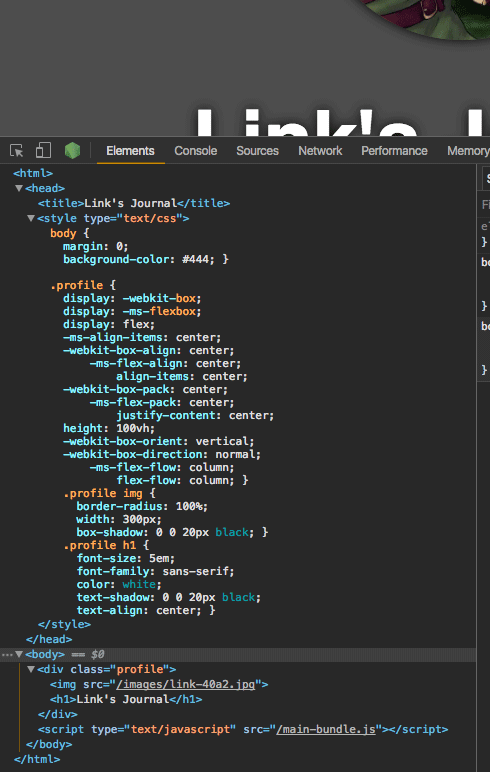
The default is to target all browsers with over 1% of the market share. Which is a lot of old browsers. This information is retrieved automatically from Can I Use, and kept up to date, so you don't have to worry about it as much.
In Sum
In this article we looked at a few options for extending CSS into a more Turing complete language. We also enhanced our developer experience with auto-prefixing for older browser compatibility.
Next Up
We'll get into CSS more in future articles. From optimizing and inlining in production to the new generation of JS based CSS solutions. Next we're going to look at integrating the Rails framework into your webpack setup.