Markdown as a Data Source with React & Webpack
In this article we're going to look at building out more of the blog functionality. We're going to add a page that loads a markdown file, which will hold the article text and information.
Using markdown is IMO a great way to maintain a blog. So much of the bloat of a piece of blogging software is in editing the data. This method cuts out all wasted time spent trying to hack someone else's idea of a dashboard, and more time spent writing and building out the features we need.
We're going to start where we left off in
the last article.
If you need to catch up:
git clone https://github.com/lawwantsin/webpack-course.git
cd webpack-course
git checkout markdown
npm install
Markdown Loader
First, let's get markdown loading and hot-reloading in our webpack bundle. As you might guess, there's a loader for that. Let's also create a new markdown file.
npm install markdown-loader
touch data/post.md
Let's write something small in post.md to get going:
# Long Ago in the Kingdom of Hyrule

Our hero wakes up.
This is a headline (as indicated by the #) and a paragragh, as indicated by
nothing.
Of course we must declare this loader in the webpack.dev.js and
webpack.prod.js. Near the end of the rules, let's add the following:
{
  test: /\.md$/,
  use: [
    {
      loader: "html-loader"
    },
    {
      loader: "markdown-loader"
    }
  ]
}
Now we want to import the markdown file into our AppRoot component where the bio import used to be.
import React from "react"
import MarkdownData from "../../data/post.md"
Just including it in the render function like any other piece of data would give us escaped HTML:
<div className="content">{MarkdownData}</div>
So we have to use the React attribute for HTML.
<div className="content" dangerouslySetInnerHTML={{ __html: MarkdownData }} />
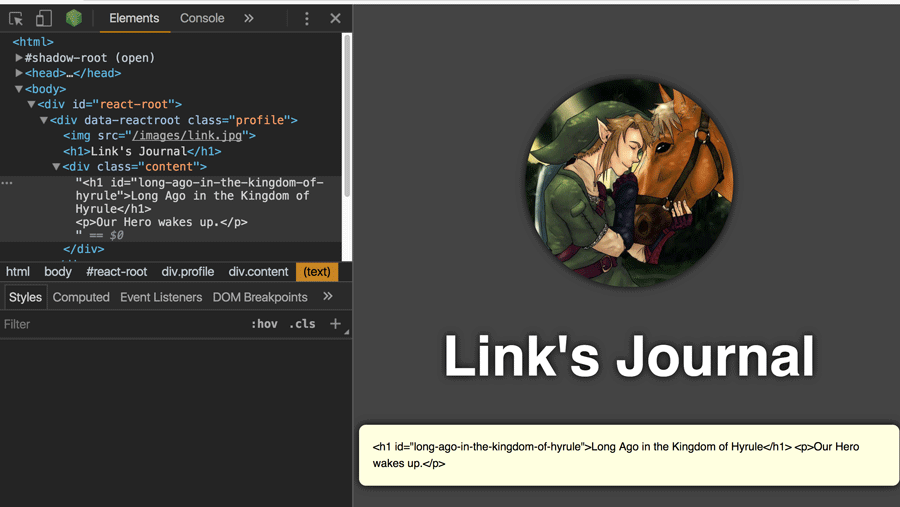
Now we get:

Almost there. We've got a little CSS scoping to do before we're back on track.
To finish the transition to markdown, main.css and content.css need their
own headings for starters.
.profile > img {
  border-radius: 100%;
  bseriesOrder: 5px;
  width: 300px;
  box-shadow: 0 0 20px black;
}

.profile > h1 {
  font-size: 5em;
  font-family: sans-serif;
  color: white;
  text-shadow: 0 0 20px black;
  text-align: left;
}
The > tells the browser to only style there immediate child, but not other
children.
In content.css:
.content > h1 {
  font-size: 2em;
  color: black;
  text-shadow: none;
  text-align: left;
}
Now we've got it:

If you edit the markdown file, it should Hot-Update on save just like any other file in Webpack. We're basically blogging now. Basically blogged up.
Front Matter
Okay, we've got content, but what about Meta Data? Each article we write will need variables, like Title, author, date Published, etc. These variables can be included in the top of the markdown file and parsed in a loader.
npm uninstall markdown-loader
npm install markdown-with-front-matter-loader
In webpack.dev.js, let's change the loaders for .md files:
{
  test: /\.md$/,
  use: [
    {
      loader: "markdown-with-front-matter-loader"
    }
  ]
}
In post.md, let's add some variables to the top of the file:
---
title: Our First Post
author: Link
---
Now we're able to use these variables in our AppRoot.js. The HTML converted
markdown is in .__content:
<h1>{MarkdownData.title}</h1>
<div
  className="content"
  dangerouslySetInnerHTML={{ __html: MarkdownData.__content }}
/>
Now we've got the best of all worlds. Meta data and content Hot reloading in the browser as we write.

In Sum
In this article we added markdown to the mix in our new blogging architecture. We're using markdown, which is a common format for bloggers. It allows for a full range of formatting, like lists and heading. It also allows for code blocks for nerds like me, who like to write code.
Next Up
We're going to build out a new page in the next article. A post page, separate from our bio page. In so doing we'll set ourselves up to split the code bundles into just what's needed for an individual page.