Optimizing Javascript with Environment Variables
In this article we're going to turn our project into something that works in both production and development, using environment variables with Webpack. We'll also discuss how libraries like React use these variables to make smaller bundles in production.
We're going to start where we let off in production ready stylesheets. If you need to catch up:
git clone https://github.com/lawwantsin/webpack-course.git
cd webpack-course
git checkout prod-js
npm install
Entry Arrays are our Friend
We've got some commented javascript in our main.js so we'll move that to the config files. Webpack is a lot simpler than it seems. The entry takes an array that can be thought of in the same way as a list of requires in any javascript file. Webpack will string these together like it does with anything else. So in config/webpack.dev.js, in our main entry, we're going to add the development only code before our main.js and then, remove them from the main.js, which is also used in production.
entry: {
  main: [
    "babel-runtime/regenerator",
    "webpack-hot-middleware/client?reload=true",
    "./src/main.js"
  ]
}
Environment Variables
Our project doesn't have a lot of javascript in it yet. So any optimization we do will feel a little underwhelming, but as we add to it, it'll get more important and we'll continue to optimize for production throughout the course. First things first, lets let define our production environment.
In the plugins array in webpack.prod.js:
new webpack.DefinePlugin({
  "process.env": {
    NODE_ENV: JSON.stringify("production")
  }
})
This will add a variable to all of our code during the webpack compilation.
In main.js at the bottom, lets add:
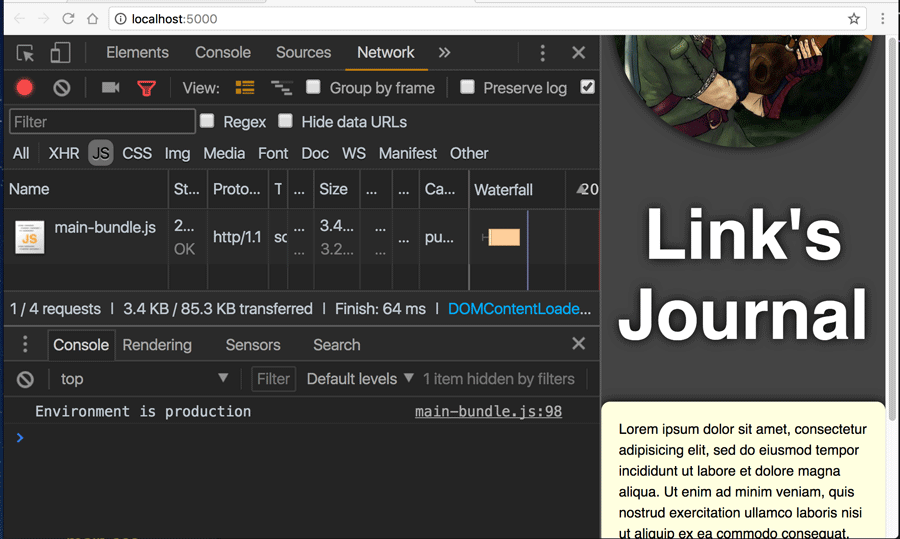
console.log(`Environment is ${process.env.NODE_ENV}`)
Now if we build then run the production version of this site.
npm run build
heroku local

We have the environment variable logged to the console and we can use that in our Javascript.
if (process.env.NODE_ENV !== "production")
  Error.new("This is some non-production error")
React, for instance uses this very idea to cut out a lot of development only magic and really get that file size down. Let's add React.
npm install react
And add it to our src/main.js
require("react")
We see that running npm run build which uses webpack.prod.js in all 3 cases, without React is 3.25 kB. If we change this variable to:
'NODE_ENV': JSON.stringify('development')
Or take it out completely, React doesn't know it's in production mode, so it outputs a 70 kB file. We still run npm run build which, if we check, still sets NODE_ENV=production from the command line.
"build": "NODE_ENV=production webpack --config=config/webpack.prod.js",

So the final savings is 70 - 14.8 - 3.25 or 51.95 kB, and it'll get even smaller in future articles with Uglify, Preact and Compression, which we'll get to in later articles.
Webpack's own Environment
This is a pretty cool feature of webpack that not a lot of folks use. When defining a config, like we do in webpack.prod.js, we can export a function instead of an object.
module.exports = env => {
  return {
    entry: {
      main: ["./src/main.js"]
    },
    ...
  }
}
Relatively minor change. The env variable is the argument and the config object is returned from the function.
In the DefinePlugin we can now use the env.NODE_ENV variable instead of a hard coded string.
new webpack.DefinePlugin({
  "process.env": {
    NODE_ENV: JSON.stringify(env.NODE_ENV)
  }
}),
Now let's change the syntax of our build to use webpack's environment variable.
"build":
  "webpack --config=config/webpack.prod.js --env.NODE_ENV=production ",
Of course, you need not use this only for NODE_ENV. You could pass any variable you wanted in the command line and access it within the config.
This pattern of assembling configs is common in webpack boilerplates out there that don't use separate dev and prod config files, so it's a good thing to know.
I find keeping config files simple is most important so I don't tend to use this feature.
Also, I don't know why Webpack doesn't just use the shell environment variables and requires this command line argument. If you know, let me know.
In Sum
In this article we covered the various ways environment variables are used in Webpack configs. We showed the gains in production builds with 3rd party libraries like React and the flexibility with which we can add variables to the compiler at run time.
Up Next
In the next article we'll finish optimizing our Javascript with a look at how Uglify, ClosureCompiler and other forms of compression work to make our javascript bundles truly small.